2D Collision Tutorial 1: RectangleThis article explains several simple techniques for constraining motion and collision detection in 2D.
Introduction
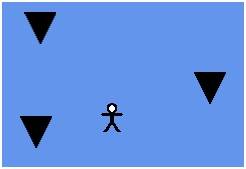
Games do not need to be complex to be fun and interesting. Obstacle avoidance games consist of a character and some objects that are on a crash course towards each other. The player must avoid the oncoming objects.
Here is the player character successfully dodging some falling blocks:
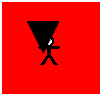
And here he is not-so-successfully dodging falling blocks:
When you complete this tutorial, you'll have everything you need to create a complete obstacle avoidance game.
Step 1: Create a New Project and Include Artwork
The first thing that you will need before you start coding are textures for the player character and falling blocks. These textures can be of any size and should use magenta (100% red, 0% green, and 100% blue) for anything that should be transparent. Save your textures as .bmp or .png files, not as .gif or .jpg, to avoid artifacts caused by lossy image compression.
Here are the textures used in the sample:


| Note |
| Magenta is used because the default texture processor will perform color keying logic, which converts magenta to be completely transparent. |
Next, you need to create a new Windows Game project and add the textures.
To create a new project
- Open XNA Game Studio 2.0.
- Click the File menu, and then click New Project to create a new project.
- From the list of templates that appears, select either Windows Game (2.0) or Xbox 360 Game (2.0).
- Type a name for your game into the Name field, and a path to where you want the game files stored in the Location field.
- Click OK.
The code for your new game will be displayed. The project already contains many of the methods that are needed to start and run a game. Right now, however, you need to make sure your art assets are being loaded. Follow these steps to get some art into your project.
To add art to your project
- Make sure you can see the Solution Explorer for your project on the right side of the window. If you cannot see it, click the View menu, and then click Solution Explorer. When it appears, you will see files associated with your project in a tree structure.
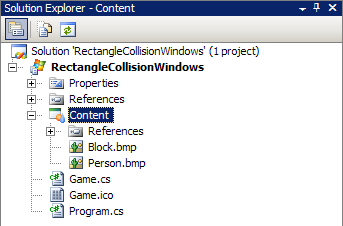
- In Solution Explorer, right-click the Content project icon (two levels below the Solution icon, called "Content"), click Add, and then click Existing Item. Using the dialog box that appears, browse to the path where your artwork is located. Select your two textures. If you can't see the textures, make sure you change the Files of type selection box to read Content Pipeline Files. Click OK.
Your project structure should look similar to this:
At this point, you're ready to code!
Step 2: Initialization and Drawing
Take a look at the code for Game1.cs; it should still be on your screen from opening up your project. The first thing you want to do is set up your drawing code. For this, you need to load and store the textures, as well as establish data structures for your player character and falling blocks. You will also declare a SpriteBatch, which you will use to draw these objects.
- Double-click the Game1.cs file in Solution Explorer to bring up the code for your game.
-
Add the following declarations inside the game class.
| |
// The images to draw
Texture2D personTexture;
Texture2D blockTexture;

// The images will be drawn with this SpriteBatch
SpriteBatch spriteBatch;

// Person
Vector2 personPosition;

// Blocks
List<Vector2> blockPositions = new List<Vector2>();
|
-
You must properly initialize these variables. The textures should be loaded in the LoadContent method and the rest of the initialization logic should be performed in the Initialize method. Make the following additions to those methods:
| |
protected override void Initialize()
{
	base.Initialize();

	// Start the player in the center along the bottom of the screen
	personPosition.X = (Window.ClientBounds.Width - personTexture.Width) / 2;
	personPosition.Y = Window.ClientBounds.Height - personTexture.Height;
}

protected override void LoadContent()
{
	// Load textures
	blockTexture = Content.Load<Texture2D>("Block");
	personTexture = Content.Load<Texture2D>("Person");

	// Create a sprite batch to draw those textures
	spriteBatch = new SpriteBatch(graphics.GraphicsDevice);
}
|
| Note |
| In this sample, all positions represent the upper-left corner of where the objects will appear on screen. Due to this, the width of the texture must be accounted for when positioning objects. |
-
Now that you have your textures and other sprite data, you need to draw them. Modify the Draw method to look like this:
| |
protected override void Draw(GameTime gameTime)
{
	graphics.GraphicsDevice.Clear(Color.CornflowerBlue);


	spriteBatch.Begin();

	// Draw person
	spriteBatch.Draw(personTexture, personPosition, Color.White);

	// Draw blocks
	foreach (Vector2 blockPosition in blockPositions)
	spriteBatch.Draw(blockTexture, blockPosition, Color.White);

	spriteBatch.End();


	base.Draw(gameTime);
}
|
-
At this point, you should be able to compile and run your project by pressing F5 or clicking the Debug menu, and then clicking Start Debugging. Your player character will be there, but where are the blocks?
| Note |
| If you have created an Xbox 360 Game and you can't see the player character, it is possible that he is being drawn outside your TV's safe region. For simplicity, you can manually decrease the value of personPosition.Y until the character is visible. See the usage of the safeBounds field in the accompanying source code for a more robust solution. |
Step 3: Making it all Move
There are no blocks being drawn because the blocks list is empty. You'll need to add logic to create and animate the falling blocks. While you're at it, why not add the ability to move the player character?
-
For simplicity, the blocks and player character will move at fixed rates. The number and position of falling blocks will be determined randomly. To represent these behaviors, you need to append the declarations at the top of the Game class:
| |
// Person
Vector2 personPosition;
const int PersonMoveSpeed = 5;

// Blocks
List<Vector2> blockPositions = new List<Vector2>();
float BlockSpawnProbability = 0.01f;
const int BlockFallSpeed = 2;

Random random = new Random();
|
These values are arbitrary; feel free to adjust them as you like.
-
Now, modify the Update method to match the following code:
| |
protected override void Update(GameTime gameTime)
{
	// Get input
	KeyboardState keyboard = Keyboard.GetState();
	GamePadState gamePad = GamePad.GetState(PlayerIndex.One);

	// Allows the game to exit
	if (gamePad.Buttons.Back == ButtonState.Pressed)
		this.Exit();

	// Move the player left and right with arrow keys or d-pad
	if (keyboard.IsKeyDown(Keys.Left) ||
		gamePad.DPad.Left == ButtonState.Pressed)
	{
		personPosition.X -= PersonMoveSpeed;
	}
	if (keyboard.IsKeyDown(Keys.Right) ||
		gamePad.DPad.Right == ButtonState.Pressed)
	{
		personPosition.X += PersonMoveSpeed;
	}

	// Spawn new falling blocks
	if (random.NextDouble() < BlockSpawnOdds)
	{
		float x = (float)random.NextDouble() *
			(Window.ClientBounds.Width - blockTexture.Width);
		blockPositions.Add(new Vector2(x, -blockTexture.Height));
	}

	// Update each block
	for (int i = 0; i < blockPositions.Count; i++)
	{
		// Animate this block falling
		blockPositions[i] =
			new Vector2(blockPositions[i].X,
				blockPositions[i].Y + BlockFallSpeed);
	}

	base.Update(gameTime);
}
|
-
Before continuing, carefully read the preceding code, which performs the following actions:
- Collects users input.
- Adjusts the position of the player character accordingly.
- Creates new blocks some percentage of the time.
- Creates new blocks at random positions along the top of the screen.
- Animates each block falling down.
Compile and run your project by pressing F5 or clicking the Debug menu, and then clicking Start Debugging. You should see your falling blocks and be able to move the player character!
Step 4: Boundary Collision
You may have noticed that you can move your character off screen and simply hide from all the following blocks (not that you would need to, because the blocks can't hurt you yet). What might not be immediately visible is the fact that your falling blocks are never being deleted. If you leave your game running for a long time, it will consume all of the memory available on your system!
To remedy these two problems, you need to constrain the player character to the window's boundaries and delete blocks that fall off the bottom.
-
Modify the Update method by adding the bold lines from the following code:
| |
protected override void Update(GameTime gameTime)
{
	// Get input
	KeyboardState keyboard = Keyboard.GetState();
	GamePadState gamePad = GamePad.GetState(PlayerIndex.One);

	// Allows the game to exit
	if (gamePad.Buttons.Back == ButtonState.Pressed)
		this.Exit();

	// Move the player left and right with arrow keys or d-pad
	if (keyboard.IsKeyDown(Keys.Left) ||
		gamePad.DPad.Left == ButtonState.Pressed)
	{
		personPosition.X -= PersonMoveSpeed;
	}
	if (keyboard.IsKeyDown(Keys.Right) ||
		gamePad.DPad.Right == ButtonState.Pressed)
	{
		personPosition.X += PersonMoveSpeed;
	}

	// Prevent the person from moving off of the screen
	personPosition.X = MathHelper.Clamp(personPosition.X,
	0, Window.ClientBounds.Width - personTexture.Width);

	// Spawn new falling blocks
	if (random.NextDouble() < BlockSpawnOdds)
	{
		float x = (float)random.NextDouble() *
			(Window.ClientBounds.Width - blockTexture.Width);
		blockPositions.Add(new Vector2(x, -blockTexture.Height));
	}

	// Update each block
	for (int i = 0; i < blockPositions.Count; i++)
	{
		// Animate this block falling
		blockPositions[i] =
			new Vector2(blockPositions[i].X,
				blockPositions[i].Y + BlockFallSpeed);

		// Remove this block if it have fallen off the screen
		if (blockPositions[i].Y > Window.ClientBounds.Height)
		{
			blockPositions.RemoveAt(i);

			// When removing a block, the next block will have the same index
			// as the current block. Decrement i to prevent skipping a block.
			i--;
		}
	}

	base.Update(gameTime);
}
|
The first set of bold code simply prevents personPosition.X from ever becoming a value that places the player character outside the window's boundaries. The second set of bold code identifies falling blocks that have left the bottom of the screen. When a block has left the bottom of the screen, it is removed from the blocks collection.
Both sets of bold code are extremely simple collision detection and response mechanisms. They rely on knowledge of the specific rules of the obstacle avoidance game.
-
Compile and run your project by pressing F5 or clicking the Debug menu, and then clicking Start Debugging. You should be unable to move your player character outside the screen, and the game won't slowly fill up your computer's memory.
Step 5: Rectangle Collision
If you have made it this far, you are just one piece of the puzzle away from something that resembles a game: your character needs to be able to get hit.
For the scope of this tutorial, the game will simply change the background color to red when the player character is hit with a falling block.
-
Add the following declaration to the top of the Game class.
| |
// For when a collision is detected
bool personHit = false;
|
-
Modify the Draw method to begin like this:
| |
protected override void Draw(GameTime gameTime)
{
	GraphicsDevice device = graphics.GraphicsDevice;

	// Change the background to red when the person was hit by a block
	if (personHit)
		device.Clear(Color.Red);
	else
		device.Clear(Color.CornflowerBlue);
|
-
Now, you need to determine whether any of the falling blocks collide with the player. One simple way to do this is to determine whether the bounding rectangles of their sprites intersect. The XNA Framework provides a simple Rectangle.Intersects method for just this purpose.
Modify the block update loop in the Update method to look like this (new lines are in bold):
| |
// Get the bounding rectangle of the person
Rectangle personRectangle =
	new Rectangle((int)personPosition.X, (int)personPosition.Y,
	personTexture.Width, personTexture.Height);

// Update each block
personHit = false;
for (int i = 0; i < blockPositions.Count; i++)
{
	// Animate this block falling
	blockPositions[i] =
		new Vector2(blockPositions[i].X,
					blockPositions[i].Y + BlockFallSpeed);

	// Get the bounding rectangle of this block
	Rectangle blockRectangle =
		new Rectangle((int)blockPositions[i].X, (int)blockPositions[i].Y,
		blockTexture.Width, blockTexture.Height);

	// Check collision with person
	if (personRectangle.Intersects(blockRectangle))
		personHit = true;

	// Remove this block if it have fallen off the screen
	if (blockPositions[i].Y > Window.ClientBounds.Height)
	{
		blockPositions.RemoveAt(i);

		// When removing a block, the next block will have the same index
		// as the current block. Decrement i to prevent skipping a block.
			i--;
	}
}
|
This code determines the bounding rectangles for the player character and for each sprite. Each block's bounding rectangle is tested for intersection with the player character's bounding rectangle.
-
And that's it. Compile and run your project by pressing F5 or clicking the Debug menu, and then clicking Start Debugging.
Congratulations!
You did it. There's a lot to making games, but you've accomplished a lot for just one short tutorial. An interactive experience with an objective thanks to simple collision detection. From here, there's no limit to where you can go!
Next...go to 2D Collision Tutorial 2: Per Pixel
Ideas to Expand
Got the urge to tinker with the project a bit? Try these ideas.
- Add a counter for number of blocks successfully dodged.
- As the game progresses, make more blocks fall, and at a faster rate.
- Add a five-second invincibility power-up. The character should have to collide with the power-up to activate.